开始
关键词:Spring Cloud、Spring Boot、Eureka、Zuul、Feign、Oauth2
初入服务端,菜鸟一枚
Spring Cloud 是基于Spring Boot的一整套完善的微服务框架,包含服务发现注册、配置中心、消息总线、负载均衡、断路器、数据监控等一系列组件,能够简单快速的的入坑微服务架构。
Spring Cloud的版本与Spring Boot有一定的对应关系,截至目前最新的稳定版本应该是Spring Cloud Greenwich + Spring Boot 2.1.x
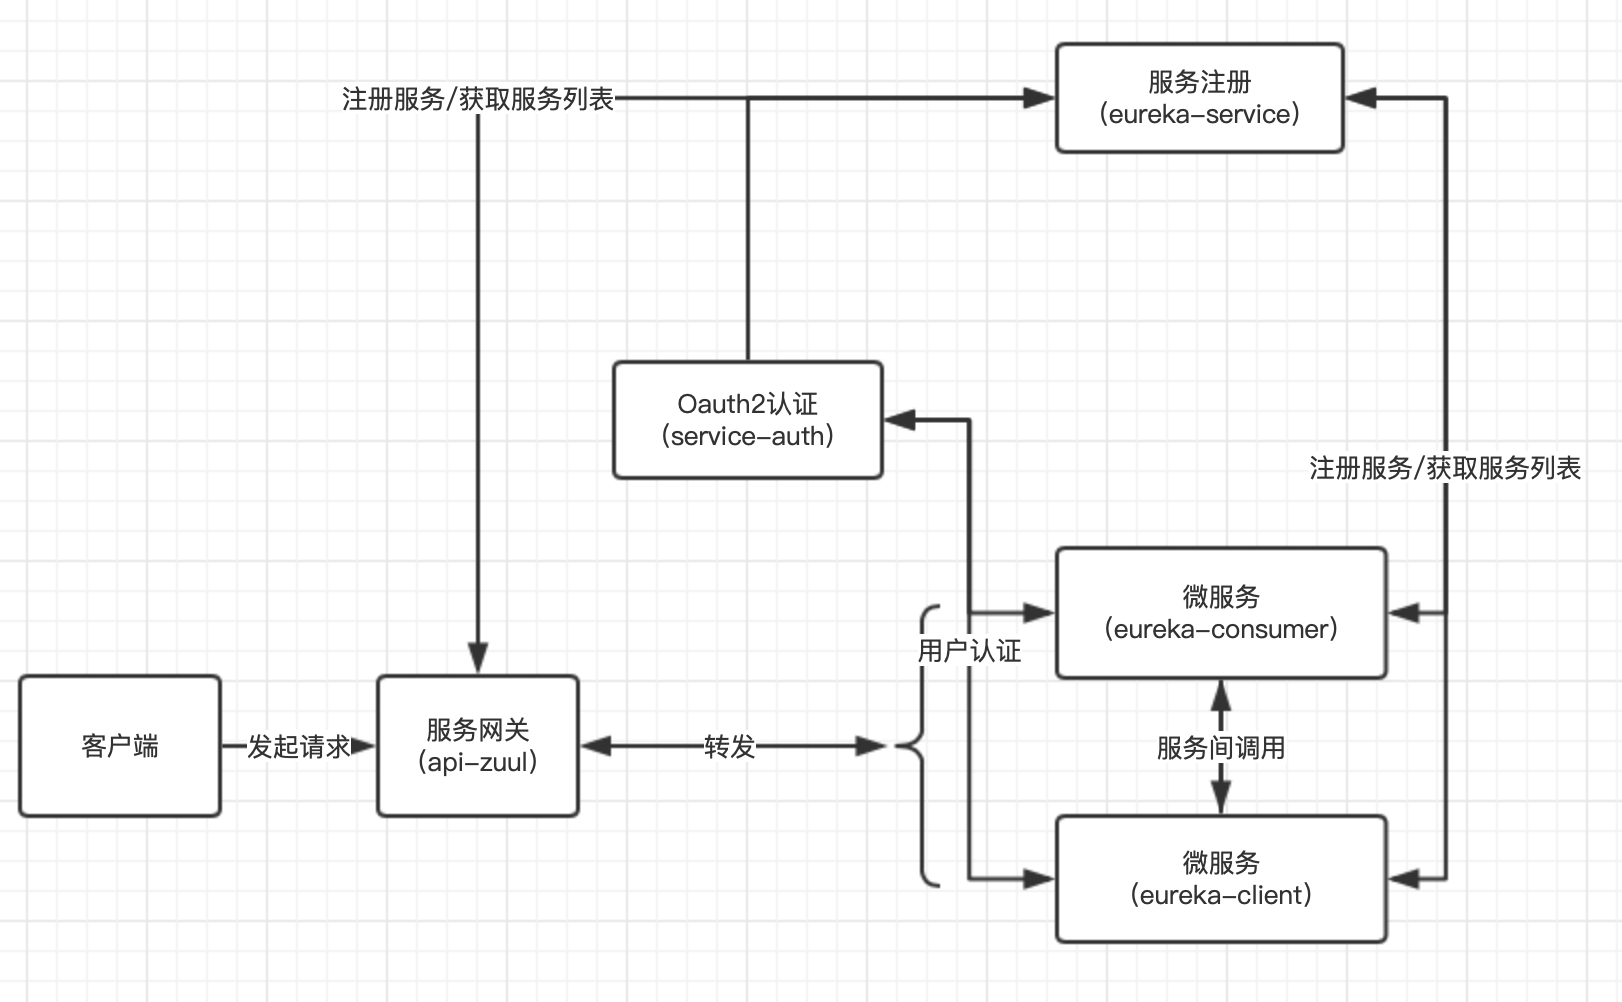
服务治理
为什么需要服务治理
随着业务不断增长,为了追求更高的性能支撑业务,集群的引入使得服务架构的复杂度大大提升。庞大的集群容易出现各种各样的问题:
- 过多的服务URL配置困难
- 负载均衡分配节点压力过大的情况下也需要部署集群
- 服务依赖混乱,启动顺序不清晰
- 过多服务导致性能指标分析难度较大,需要监控
简单来说主要是通过服务治理可以通过服务名来访问服务,不需要通过url来直接访问,这样子可以有利于负载均衡实现与服务间解耦。
Eureka 入门
- maven依赖
1
2
3
4
5
6
7
8
9
10
|
<dependency>
<groupId>org.springframework.cloud</groupId>
<artifactId>spring-cloud-starter-netflix-eureka-server</artifactId>
</dependency>
<dependency>
<groupId>org.springframework.cloud</groupId>
<artifactId>spring-cloud-starter-netflix-eureka-client</artifactId>
</dependency>
|
- 服务端application.yml
1
2
3
4
5
6
7
8
9
10
11
12
13
14
15
| spring:
application:
name: eureka-server
server:
port: 8001
eureka:
instance:
hostname: localhost
client:
register-with-eureka: false
fetch-registry: false
|
- 客户端application.yml
1
2
3
4
5
6
7
8
9
10
| spring:
application:
name: xxx
eureka:
client:
serviceUrl:
defaultZone: http://localhost:8001/eureka/
|
- 服务端注解@EnableEurekaServer
1
2
3
4
5
6
7
8
9
10
11
12
|
@EnableEurekaServer
@SpringBootApplication
public class EurekaServiceApplication {
public static void main(String[] args) {
SpringApplication.run(EurekaServiceApplication.class, args);
}
}
|
- 客户端注解@EnableEurekaClient
1
2
3
4
5
6
7
8
9
| @EnableEurekaClient
@SpringBootApplication
public class EurekaServiceApplication {
public static void main(String[] args) {
SpringApplication.run(EurekaServiceApplication.class, args);
}
}
|
- 发现服务(查看已注册服务)
1
2
3
4
5
6
7
8
9
10
11
12
13
14
15
| @Slf4j
@RestController
public class DcController {
@Autowired
DiscoveryClient mDiscoveryClient;
@GetMapping("/dc")
public Result dc() throws Exception {
String services = "Services: " + mDiscoveryClient.getServices();
log.info(services);
return ResultUtils.resultData(ResultEnum.SUCCESS, "eureka-client返回的数据:" + services);
}
}
|
- 其他
网页直接访问服务端可以查看当前已经注册了哪些服务
ex: http://localhost:8001/
服务网关
简介
服务网关是微服务架构中一个不可或缺的部分。通过服务网关统一向外系统提供REST API,具备服务路由、过滤、负载均衡等功能,也可以实现用户认证功能。目前用的比较多的有Zuul、Spring Cloud Gateway,Spring Cloud Gateway依赖Spring Boot和Spring Webflux提供的Netty runtime,是目前官方推荐的网关,但是我在使用过程中OAuth出现了问题,所以还是用的Zuul。
Zuul
- maven依赖
1
2
3
4
5
6
7
8
9
|
<dependency>
<groupId>org.springframework.cloud</groupId>
<artifactId>spring-cloud-starter-netflix-eureka-client</artifactId>
</dependency>
<dependency>
<groupId>org.springframework.cloud</groupId>
<artifactId>spring-cloud-starter-netflix-zuul</artifactId>
</dependency>
|
- application.yml
1
2
3
4
5
6
7
8
9
10
11
12
13
14
15
16
17
18
19
20
21
22
23
24
25
26
27
28
29
30
31
32
33
34
35
36
37
38
39
| server:
port: 8002
spring:
application:
name: api-gateway
zuul:
host:
connect-timeout-millis: 20000
socket-timeout-millis: 20000
ignoredServices: '*'
prefix: /api
routes:
auth-service:
path: /auth/**
sensitiveHeaders:
serviceId: service-auth
consumer-service:
path: /consumer/**
sensitiveHeaders:
serviceId: eureka-consumer
client-service:
path: /client/**
sensitiveHeaders:
serviceId: eureka-client
add-proxy-headers: true
include-debug-header: true
eureka:
client:
serviceUrl:
defaultZone: http://localhost:8001/eureka/
logging:
level:
com.netflix: DEBUG
|
- 添加@EnableZuulProxy注解启动网关服务
1
2
3
4
5
6
7
8
9
| @EnableZuulProxy
@EnableEurekaClient
@SpringBootApplication
public class ApiZuulApplication {
public static void main(String[] args) {
SpringApplication.run(ApiZuulApplication.class, args);
}
}
|
- 其它
如果不使用路由,直接通过服务名访问服务,我在测试过程中遇到了Oauth一直显示认证失败的问题。
服务通信
简介
服务间通信实际上是通过Url(RestFul)来进行通信的,通过服务治理我们可以通过服务名等方式进行服务间通信
以下方式均调用的其他服务的同一个方法,服务名为eureka-client
1
2
3
4
5
6
7
8
9
10
11
12
13
14
15
| @Slf4j
@RestController
public class DcController {
@Autowired
DiscoveryClient mDiscoveryClient;
@GetMapping("/dc")
public Result dc() throws Exception {
String services = "Services: " + mDiscoveryClient.getServices();
log.info(services);
return ResultUtils.resultData(ResultEnum.SUCCESS, "eureka-client返回的数据:" + services);
}
}
|
LoadBalancerClient
LoadBalancerClient是带有负载均衡的最基础的服务间通信组件
- 启动配置
1
2
3
4
5
6
7
8
9
10
11
12
13
14
15
|
@EnableEurekaClient
@SpringBootApplication
public class Application {
@Bean
public RestTemplate restTemplate() {
return new RestTemplate();
}
public static void main(String[] args) {
new SpringApplicationBuilder(Application.class).web(true).run(args);
}
}
|
- 使用方法
1
2
3
4
5
6
7
8
9
10
11
12
13
14
15
16
17
18
19
20
21
22
23
| @Slf4j
@RequestMapping("/lbc")
@RestController
public class LbcController {
@Autowired
LoadBalancerClient loadBalancerClient;
@Autowired
RestTemplate restTemplate;
@GetMapping("/consumer")
public Result dc() {
ServiceInstance serviceInstance = loadBalancerClient.choose("eureka-client");
String url = "http://" + serviceInstance.getHost() + ":" + serviceInstance.getPort() + "/dc";
log.info(url);
return restTemplate.getForObject(url, Result.class);
}
}
|
Ribbn
Spring Cloud Ribbon是基于Netflix Ribbon实现的一套客户端负载均衡的工具。它是一个基于HTTP和TCP的客户端负载均衡器。
- maven依赖
1
2
3
4
5
6
|
<dependency>
<groupId>org.springframework.cloud</groupId>
<artifactId>spring-cloud-starter-ribbon</artifactId>
<version>1.4.7.RELEASE</version>
</dependency>
|
- 启动配置
1
2
3
4
5
6
7
8
9
10
11
12
13
14
15
|
@EnableEurekaClient
@SpringBootApplication
public class Application {
@Bean
@LoadBalanced
public RestTemplate restTemplate() {
return new RestTemplate();
}
public static void main(String[] args) {
new SpringApplicationBuilder(Application.class).web(true).run(args);
}
}
|
- 使用方法
1
2
3
4
5
6
7
8
9
10
11
12
13
14
|
@Slf4j
@RequestMapping("/ribbon")
@RestController
public class RibbonController {
@Autowired
RestTemplate restTemplate;
@GetMapping("/consumer")
public Result consumer() {
return restTemplate.getForObject("http://eureka-client/dc", Result.class);
}
}
|
Feign
这个是我比较喜欢的方式,调用简单,也可以通过RequestInterceptor统一设置Header用来做用户认证
- maven依赖
1
2
3
4
5
6
|
<dependency>
<groupId>org.springframework.cloud</groupId>
<artifactId>spring-cloud-starter-feign</artifactId>
<version>1.4.7.RELEASE</version>
</dependency>
|
- 启动配置,只需要添加一个注解即可
1
2
3
4
5
6
7
8
9
10
11
|
@EnableFeignClients
@EnableEurekaClient
@SpringBootApplication
public class EurekaConsumerApplication {
public static void main(String[] args) {
SpringApplication.run(EurekaConsumerApplication.class, args);
}
}
|
使用方法
第一步先定义一个接口文件
1
2
3
4
5
6
7
8
9
10
11
12
13
14
15
16
|
@FeignClient(name = "eureka-client")
public interface DcClient {
@GetMapping("/dc")
Result consumer();
}
|
- 第二步直接调用定义的接口就可以
1
2
3
4
5
6
7
8
9
10
11
12
| @RequestMapping("/feign")
@RestController
public class FeignController {
@Autowired
DcClient mDcClient;
@GetMapping("/consumer")
public Result consumer() {
return mDcClient.consumer();
}
}
|
- 通过
RequestInterceptor拦截器为服务请求添加Oauth2认证参数
1
2
3
4
5
6
7
8
9
10
11
12
13
14
| @Component
public class SecuringRequestInterceptor implements RequestInterceptor {
@Override
public void apply(RequestTemplate requestTemplate) {
ServletRequestAttributes attributes = (ServletRequestAttributes) RequestContextHolder
.getRequestAttributes();
HttpServletRequest request = attributes.getRequest();
String authorization = request.getHeader("Authorization");
if (!StringUtils.isEmpty(authorization)) {
requestTemplate.header("Authorization", authorization);
}
}
}
|
Oauth2.0
Oauth2.0认证占用本文大半篇幅,但也是简单使用,后期准备在补一篇完整的Spring Cloud Oauth2使用水文。
Spring Cloud Oauth依赖了Spring Security,所以角色权限认证均使用的Spring Security的方式认证。
本文仅使用Redis存储Oauth2相关数据
授权服务
- 授权服务器maven文件
1
2
3
4
5
6
7
8
9
10
11
12
13
14
15
16
17
18
19
20
21
22
23
24
25
26
27
28
| <dependency>
<groupId>org.springframework.cloud</groupId>
<artifactId>spring-cloud-starter-netflix-eureka-client</artifactId>
</dependency>
<dependency>
<groupId>org.springframework.boot</groupId>
<artifactId>spring-boot-starter-actuator</artifactId>
</dependency>
<dependency>
<groupId>org.springframework.boot</groupId>
<artifactId>spring-boot-starter-data-redis</artifactId>
</dependency>
<dependency>
<groupId>org.springframework.cloud</groupId>
<artifactId>spring-cloud-starter-oauth2</artifactId>
</dependency>
<dependency>
<groupId>mysql</groupId>
<artifactId>mysql-connector-java</artifactId>
<scope>runtime</scope>
</dependency>
<dependency>
<groupId>org.mybatis.spring.boot</groupId>
<artifactId>mybatis-spring-boot-starter</artifactId>
<version>2.1.1</version>
</dependency>
|
- Oauth2有三张基础表,可以根据业务增加字断,表结构如下:
1
2
3
4
5
6
7
8
9
10
11
12
13
14
15
16
17
18
19
20
21
22
23
24
25
26
27
28
29
30
31
32
33
34
35
36
37
38
39
| SET NAMES utf8mb4;
SET FOREIGN_KEY_CHECKS = 0;
DROP TABLE IF EXISTS `role`;
CREATE TABLE `role` (
`id` bigint(20) NOT NULL AUTO_INCREMENT,
`name` varchar(255) NOT NULL,
PRIMARY KEY (`id`)
) ENGINE=InnoDB AUTO_INCREMENT=5 DEFAULT CHARSET=utf8;
DROP TABLE IF EXISTS `user`;
CREATE TABLE `user` (
`id` bigint(20) NOT NULL AUTO_INCREMENT,
`username` varchar(255) NOT NULL,
`password` varchar(255) CHARACTER SET utf8 COLLATE utf8_general_ci DEFAULT NULL,
PRIMARY KEY (`id`),
UNIQUE KEY `UK_sb8bbouer5wak8vyiiy4pf2bx` (`username`)
) ENGINE=InnoDB AUTO_INCREMENT=8 DEFAULT CHARSET=utf8;
DROP TABLE IF EXISTS `user_role`;
CREATE TABLE `user_role` (
`user_id` bigint(20) NOT NULL,
`role_id` bigint(20) NOT NULL,
KEY `FKa68196081fvovjhkek5m97n3y` (`role_id`),
KEY `FK859n2jvi8ivhui0rl0esws6o` (`user_id`),
CONSTRAINT `FK859n2jvi8ivhui0rl0esws6o` FOREIGN KEY (`user_id`) REFERENCES `user` (`id`),
CONSTRAINT `FKa68196081fvovjhkek5m97n3y` FOREIGN KEY (`role_id`) REFERENCES `role` (`id`)
) ENGINE=InnoDB DEFAULT CHARSET=utf8;
SET FOREIGN_KEY_CHECKS = 1;
|
先写一下获取用户信息吧
Oauth2默认调用org.springframework.security.core.userdetails.UserDetailsService获取用户信息,所以我们继承UserDetailsService重写loadUserByUsername方法来实现获取用户的方法。
- 创建一个
AuthUserDetailsService类
1
2
3
4
5
6
7
8
9
10
11
12
13
14
15
16
17
18
19
20
21
22
| @Slf4j
@Service("userDetailService")
public class AuthUserDetailsService implements UserDetailsService {
@Autowired
private UserDao mUserDao;
@Autowired
private UserRoleDao mUserRoleDao;
@Override
public UserDetails loadUserByUsername(String userName) throws UsernameNotFoundException {
List<UserDo> userDos = mUserDao.listUserByUserName(userName);
if (userDos == null || userDos.size() == 0) {
throw new UsernameNotFoundException("用不存在");
}
UserDo userDo = userDos.get(0);
List<RoleDo> roleDos = mUserRoleDao.listRoleByUserId(userDo.getId());
userDo.setAuthorities(roleDos);
log.info(userDo.toString());
return userDo;
}
}
|
UserDo实现了UserDetails的相关接口
1
2
3
4
5
6
7
8
9
10
11
12
13
14
15
16
17
18
19
20
21
22
23
24
25
26
27
28
29
30
31
32
33
34
35
36
37
38
39
40
41
42
43
44
45
46
47
48
49
50
51
52
53
| @Data
public class UserDo implements UserDetails, Serializable {
private Long id;
private String username;
private String password;
private List<RoleDo> authorities;
@Override
public Collection<? extends GrantedAuthority> getAuthorities() {
return authorities;
}
@Override
public boolean isAccountNonExpired() {
return true;
}
@Override
public boolean isAccountNonLocked() {
return true;
}
@Override
public boolean isCredentialsNonExpired() {
return true;
}
@Override
public boolean isEnabled() {
return true;
}
}
|
RoleDo
从上面代码可以看到getAuthorities方法返回的集合数据里面的对象继承了GrantedAuthority,所以我们的RoleDo要实现GrantedAuthority接口
1
2
3
4
5
6
7
8
9
10
11
| @Data
public class RoleDo implements GrantedAuthority, Serializable {
private Long id;
private String name;
@Override
public String getAuthority() {
return name;
}
}
|
WebSecurityConfigurerAdapter
1
2
3
4
5
6
7
8
9
10
11
12
13
14
15
16
17
18
19
20
21
22
23
24
25
26
27
28
29
30
31
32
33
34
35
36
37
38
39
40
| @Configuration
@EnableWebSecurity
public class SecurityConfig extends WebSecurityConfigurerAdapter {
@Autowired
private AuthUserDetailsService userDetailService;
@Override
protected void configure(HttpSecurity http) throws Exception {
http.requestMatchers()
.anyRequest()
.and()
.authorizeRequests()
.antMatchers("/oauth/**")
.permitAll();
}
@Override
protected void configure(AuthenticationManagerBuilder auth) throws Exception {
auth.userDetailsService(userDetailService).passwordEncoder(new BCryptPasswordEncoder());
}
@Override
@Bean
public AuthenticationManager authenticationManagerBean() throws Exception {
return super.authenticationManagerBean();
}
public static void main(String[] args) {
System.out.println(new BCryptPasswordEncoder().encode("123456"));
}
}
|
- OAuth2AuthorizationConfig
1
2
3
4
5
6
7
8
9
10
11
12
13
14
15
16
17
18
19
20
21
22
23
24
25
26
27
28
29
30
31
32
33
34
35
36
37
38
39
40
41
42
43
44
45
46
47
48
49
50
51
52
53
54
55
56
57
58
59
60
61
62
63
64
65
66
67
68
69
70
71
72
73
| @Configuration
@EnableAuthorizationServer
public class OAuth2AuthorizationConfig extends AuthorizationServerConfigurerAdapter {
@Autowired
private AuthenticationManager authenticationManager;
@Autowired
private RedisConnectionFactory redisConnectionFactory;
@Autowired
private AuthUserDetailsService userDetailService;
private static final String finalSecret = "{bcrypt}" + new BCryptPasswordEncoder().encode("sdwfqin");
@Bean
public TokenStore tokenStore() {
return new RedisTokenStore(redisConnectionFactory);
}
@Override
public void configure(ClientDetailsServiceConfigurer clients) throws Exception {
clients.inMemory()
.withClient("android")
.secret(finalSecret)
.authorizedGrantTypes("password", "refresh_token")
.scopes("mobile")
.and()
.withClient("service")
.secret(finalSecret)
.authorizedGrantTypes("client_credentials", "refresh_token")
.scopes("service");
}
@Override
public void configure(AuthorizationServerEndpointsConfigurer endpoints) throws Exception {
endpoints
.userDetailsService(userDetailService)
.authenticationManager(authenticationManager)
.tokenStore(tokenStore())
.tokenServices(redisTokenServices());
}
@Override
public void configure(AuthorizationServerSecurityConfigurer security) throws Exception {
security
.allowFormAuthenticationForClients()
.tokenKeyAccess("permitAll()")
.checkTokenAccess("isAuthenticated()");
}
@Bean
public DefaultTokenServices redisTokenServices() {
DefaultTokenServices tokenServices = new DefaultTokenServices();
tokenServices.setTokenStore(tokenStore());
tokenServices.setSupportRefreshToken(true);
tokenServices.setAccessTokenValiditySeconds(60 * 60 * 12);
tokenServices.setRefreshTokenValiditySeconds(60 * 60 * 24 * 7);
return tokenServices;
}
}
|
- 为其他服务暴露获取用户信息的接口
1
2
3
4
5
6
7
8
9
10
11
12
13
14
15
16
17
18
| @Slf4j
@RestController
@RequestMapping("/user")
public class UserController {
@RequestMapping(value = "/current", method = RequestMethod.GET)
public Principal getUser(Principal principal) {
log.info(">>>>>>>>>>>>>>>>>>>>>>>>");
log.info(principal.toString());
log.info(">>>>>>>>>>>>>>>>>>>>>>>>");
return principal;
}
@GetMapping("/register")
public Result register() {
return ResultUtils.resultData(ResultEnum.SUCCESS, "注册");
}
}
|
- 授权服务上面的资源服务配置
ResourceServerConfig
1
2
3
4
5
6
7
8
9
10
11
12
13
14
15
16
17
18
19
20
21
22
23
24
25
26
27
28
29
30
31
32
33
34
35
36
37
38
39
40
41
42
| @Slf4j
@Configuration
@EnableResourceServer
public class ResourceServerConfig extends ResourceServerConfigurerAdapter {
private ObjectMapper objectMapper = new ObjectMapper();
@Override
public void configure(ResourceServerSecurityConfigurer resources) throws Exception {
resources.accessDeniedHandler((request, response, e) -> {
log.error("【accessDeniedHandler】{}", e.getMessage());
response.setContentType(MediaType.APPLICATION_JSON_UTF8_VALUE);
response.getWriter()
.write(objectMapper.writeValueAsString(ResultUtils.errorData(ResultEnum.AUTHORITY_ERROR)));
});
resources.authenticationEntryPoint((request, response, e) -> {
log.error("【authenticationEntryPoint】{}", e.getMessage());
response.setContentType(MediaType.APPLICATION_JSON_UTF8_VALUE);
response.getWriter()
.write(objectMapper.writeValueAsString(ResultUtils.errorData(ResultEnum.TOKEN_ERROR)));
});
}
@Override
public void configure(HttpSecurity http) throws Exception {
http.csrf().disable()
.httpBasic().disable()
.authorizeRequests()
.antMatchers("/user/register")
.permitAll()
.anyRequest()
.authenticated();
}
}
|
资源服务器鉴权
- maven文件
1
2
3
4
5
|
<dependency>
<groupId>org.springframework.cloud</groupId>
<artifactId>spring-cloud-starter-oauth2</artifactId>
</dependency>
|
- ResourceServerConfig配置跟上面的基本相似,设置服务内的放行规则
1
2
3
4
5
6
7
8
9
10
11
12
13
14
15
16
17
18
19
20
21
22
23
24
25
26
27
28
29
30
31
32
33
34
35
36
37
| @Slf4j
@Configuration
@EnableResourceServer
public class ResourceServerConfig extends ResourceServerConfigurerAdapter {
private ObjectMapper objectMapper = new ObjectMapper();
@Override
public void configure(ResourceServerSecurityConfigurer resources) throws Exception {
resources.accessDeniedHandler((request, response, e) -> {
log.error("【accessDeniedHandler】{}", e.getMessage());
response.setContentType(MediaType.APPLICATION_JSON_UTF8_VALUE);
response.getWriter()
.write(objectMapper.writeValueAsString(ResultUtils.errorData(ResultEnum.AUTHORITY_ERROR)));
});
resources.authenticationEntryPoint((request, response, e) -> {
log.error("【authenticationEntryPoint】{}", e.getMessage());
response.setContentType(MediaType.APPLICATION_JSON_UTF8_VALUE);
response.getWriter()
.write(objectMapper.writeValueAsString(ResultUtils.errorData(ResultEnum.TOKEN_ERROR)));
});
}
@Override
public void configure(HttpSecurity http) throws Exception {
http.csrf().disable()
.httpBasic().disable()
.authorizeRequests()
.anyRequest()
.authenticated();
}
}
|
- application.yml
通过走zuul的路由访问。
1
2
3
4
5
6
7
8
9
10
| security:
oauth2:
resource:
user-info-uri: http://localhost:8002/api/auth/user/current
client:
client-id: service
client-secret: sdwfqin
access-token-uri: http://localhost:8002/api/auth/oauth/token
user-authorization-uri: http://localhost:8002/api/auth/oauth/authorize
scope: service
|
参考文章与对应Demo
文中没有接口调用示例,如需查看请下载Demo运行并且将接口json文件导入Postman即可
对应Demo查看:https://github.com/sdwfqin/SpringCloudSample
参考文章:
- Spring Cloud 从入门到精通(程序猿DD-翟永超)
- SpringCloud+SpringBoot+OAuth2+Spring Security+Redis实现的微服务统一认证授权(myCat、)